 By Owen Palmer
Updated November 2026
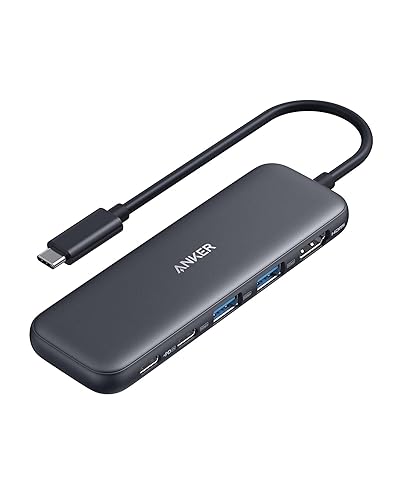
A usb c hub for Chromebook adds the ports your laptop is missing, such as USB-A, HDMI, SD card slots and Ethernet, without replacing the machine. In this guide, you will work out which ports you actually need, confirm your Chromebook supports them, and connect the hub so it runs reliably. Most problems come down to a mismatch between the hub’s features and what the Chromebook can do, so the checks below matter more than the brand name.
Step 1: List the Ports You Need
Start with the devices you plug in every day. A monitor, an external drive, a USB keyboard and a charger each place different demands on a hub, and writing them down prevents overbuying or underbuying. Pay attention to whether a device needs the full 5 Gbps USB 3.x speed or simply works on USB 2.0.
Shopping for one? See our guide: USB C Ethernet Hub vs Wi-Fi Dongle (2026): Which Is Better for Wired Internet?.
- USB-A ports for mice, keyboards, flash drives and older accessories
- HDMI or DisplayPort for an external monitor or projector
- SD or microSD slots for camera cards
- Ethernet for a wired connection when Wi-Fi is unreliable
- Power Delivery pass-through to charge the Chromebook while you work
Step 2: Confirm Your Chromebook’s USB-C Support
Not every USB-C port on a Chromebook behaves the same way. Check the spec sheet for DisplayPort Alt Mode, which carries video through USB-C, and for Power Delivery, which handles charging. Some ports only transfer data, so a hub that depends on video or charging will not work on them. The official Chrome OS support pages and your manufacturer’s listing are the reliable sources here.
Step 3: Match the Hub to Your Display and Power Needs
If you plan to use an external screen, check the maximum resolution and refresh rate the hub’s video output supports, and compare that with your monitor. Manufacturers usually specify the supported resolution for each output, and many hubs cap at 4K at 30 Hz on HDMI. For power, look for a hub that passes through enough wattage to charge your Chromebook while peripherals draw current. Our guide to Understanding USB-C Charger Wattage and Power Delivery explains how to read those numbers.
| Your Need | What to Look For |
|---|---|
| External monitor | HDMI or DisplayPort output that matches your display’s resolution |
| Charging while working | USB-C Power Delivery pass-through rated for your charger’s wattage |
| Fast file transfers | USB 3.x data ports, not USB 2.0 |
| Reliable wired internet | Gigabit Ethernet port |
Step 4: Connect and Test the Hub
Plug the hub directly into a USB-C port on the Chromebook, not into a second hub or a cheap extension cable. Connect power to the hub’s charging port first if it has one, then attach your peripherals one at a time. Open the Chromebook’s display settings to confirm an external monitor is detected, and use the Files app to check that a drive appears. If a device fails, unplug the hub and try the cable on another port, since a faulty cable is a common cause.
Sub-step: Check the Cable
Use the cable that came with the hub or a certified USB-C cable rated for data and power. Charge-only cables cannot carry video or data, so a hub connected with one will appear dead or partially working. For a deeper explanation, see Why a USB-C Cable or Port Doesn’t Work: Charge-Only Cables, Alt Mode and E-Marked Cables.
Checklist Before You Buy or Connect
- Write down every device you plug in and whether it needs video, charging or high-speed data.
- Check your Chromebook’s USB-C port specs for Alt Mode and Power Delivery.
- Match the hub’s video output to your monitor’s resolution and refresh rate.
- Confirm the Power Delivery pass-through wattage covers your charger.
- Use a certified USB-C cable and test each port after connecting.
Common Mistakes to Avoid
- Plugging a hub into another hub, which often limits power and bandwidth.
- Assuming every USB-C port on the Chromebook supports video output.
- Buying a hub with more ports than you need while skipping the features you do need.
- Ignoring USB 2.0 versus USB 3.x labels when copying large files.
- Expecting a hub to deliver more power than your Chromebook’s charger supplies.
Recommended Gear
A hub that matches your ports is the main purchase, but a few accessories help keep the setup stable. A good starting point is a multi-port hub with HDMI, USB-A and SD card support.
- Multi-port USB-C hub with HDMI and USB-A: covers the most common Chromebook needs in one device. View on Amazon
- Certified USB-C to USB-C cable: reduces connection problems caused by charge-only or underspecified cables. View on Amazon
- Ethernet-capable USB-C adapter: useful if you need a wired connection in a room with weak Wi-Fi. View on Amazon
FAQ
Will any USB-C hub work with a Chromebook?
Most hubs connect, but features like video output and charging depend on your Chromebook’s port support. Check the spec sheet for DisplayPort Alt Mode and Power Delivery before buying.
Why does my external monitor not show up?
Confirm the Chromebook’s USB-C port supports video output and that the hub’s HDMI or DisplayPort works with your monitor’s input. Try a different cable and port, and check the display settings after connecting.
Can a hub charge my Chromebook?
Only if the hub includes a Power Delivery pass-through and your charger supplies enough wattage. Connect the charger to the hub, then confirm charging in the Chromebook’s status area.
Conclusion
A usb c hub for Chromebook works best when you match its ports to your devices and confirm your laptop’s USB-C capabilities. Start with a list of what you connect, check video and charging support, and test with a certified cable. With those checks done, the hub should give you the extra ports without surprises.
Related reading
Ready to choose one?
About Owen Palmer
Owen Palmer is part of our editorial team and reviews and edits our consumer tech how-to & troubleshooting guides, checking product details against manufacturer specifications and owner feedback.